Page Build Process
The comet pdf renderer supports different ways of building PDF pages. You can use a build script, or you can use items.xml.
- To get more information about rendering in comet pdf renderer using items.xml, please read the comet documentation or ask the comet Team at WERK II.
- To get more information about products.xml, please read the XML data format documentation.
Render Documents Using A Build Script
Rendering based on a comet build script will be the most typical use case.
In the cloud environment you must specify the build script in the /renderpdf/config.ion file.
The related property is buildScript. The value is a name in the /scripts folder of the comet_xml project.
Here comes an example:
{
  cometPdfVersion : "R30316",
  buildScript : "build-product-by-rule.py"
  // ...
}
This is equivalent to a standalone call like this
comet_pdf --exec $cometXmlPath/scripts/build-product-by-rule.py
Render Document Using items.xml
The cloud environment also supports rendering of product lists.
You must set the buildScript property in the /renderpdf/config.ion file to place. Alternatively, you may also omit the buildScript property, which defaults to place.
Here comes an example:
{
  cometPdfVersion : "R30316",
  buildScript : "place"
  // ...
}
This is equivalent to a standalone call like this
comet_pdf --productlist $jobPath/items.xml --exec place
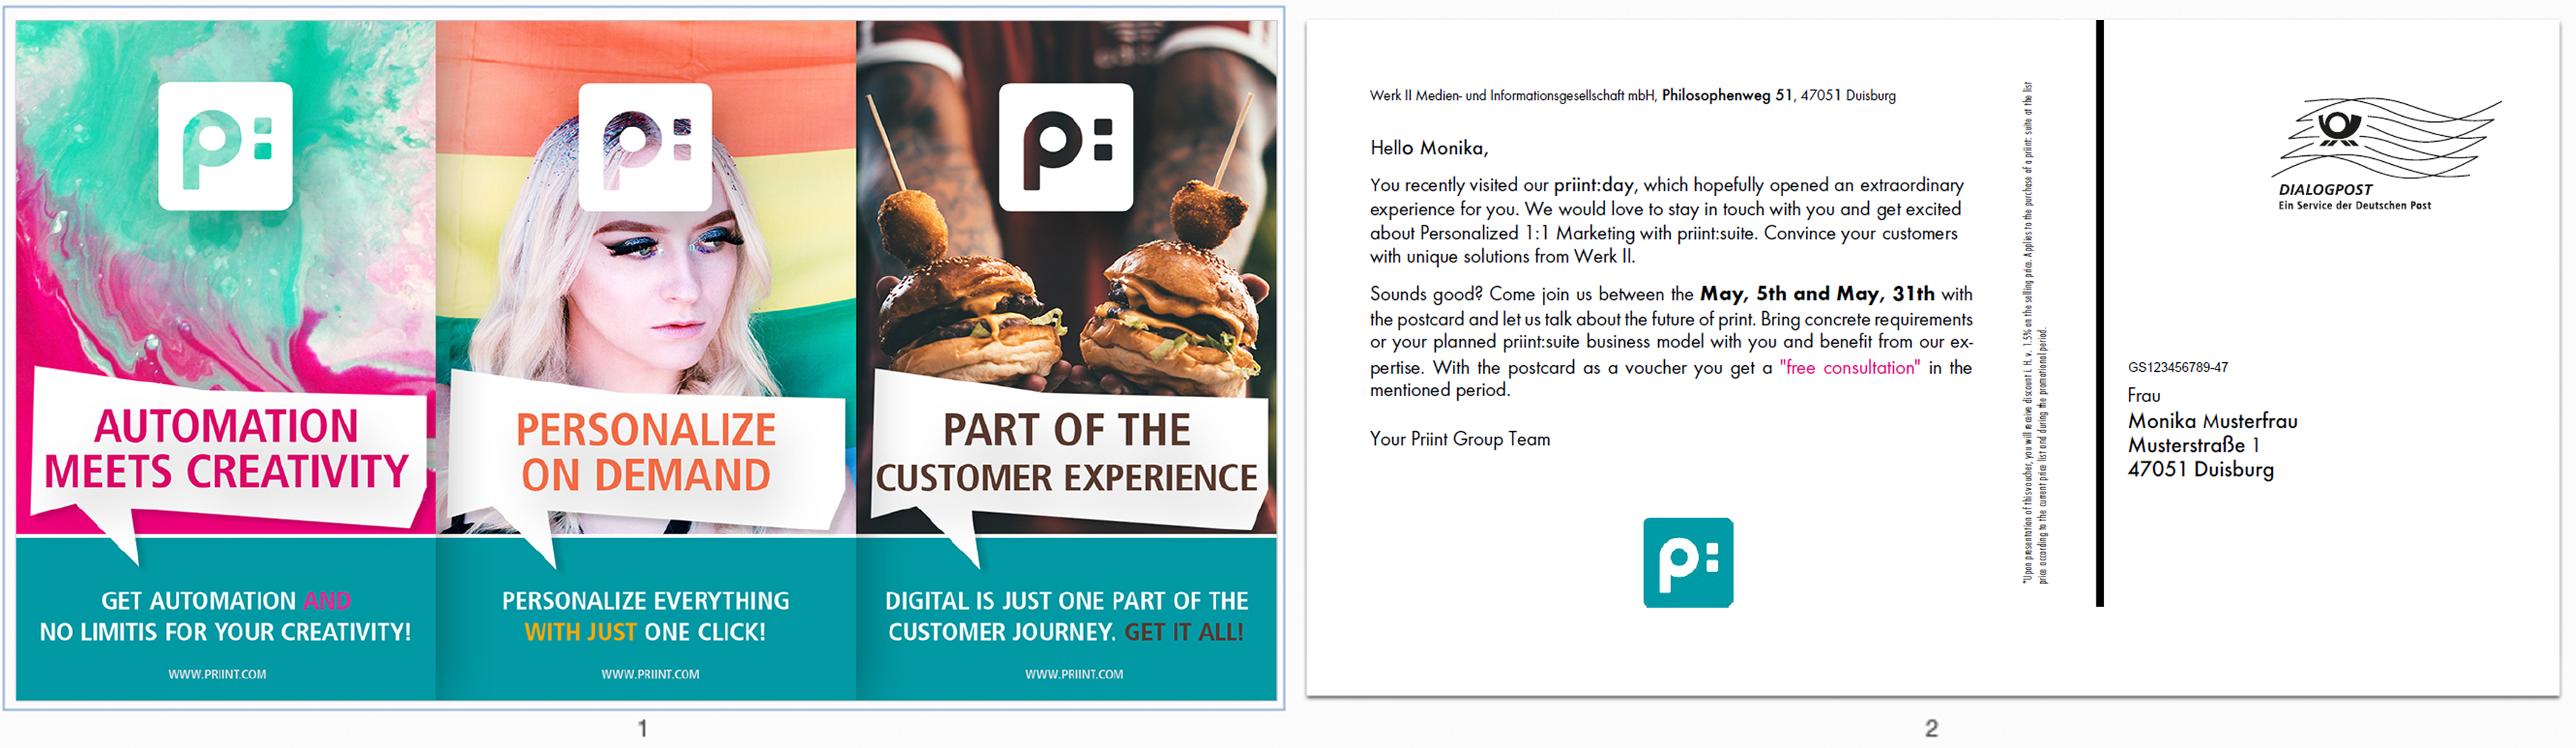
Example 1 - Postcards Demo
In our “postcard demo” we generate a postcard. Typically, a postcard contains 2 pages. We prepared one template for each page. Also, in our case we need an items.xml with 3 entries. One describes a page template used in this publication. The other 2 entries are created for each page:
<items>
  <item>
    <ID>3</ID>
    <ID2>0</ID2>
    <ID3>0</ID3>
    <type>pagetemplate</type>
    <pageType>1</pageType>
    <document-position>-1</document-position>
    <classID>3</classID>
    <status>normal</status>
  </item>
  <item>
    <ID>1</ID>
    <ID2>0</ID2>
    <ID3>0</ID3>
    <stringID>6e0ee094-72cb-44ea-856e-52e6744211d5</stringID>
    <pageitemID>54</pageitemID>
    <type>product</type>
    <status>inserted</status>
  </item>
  <item>
    <ID>1</ID>
    <ID2>0</ID2>
    <ID3>0</ID3>
    <stringID>6e0ee094-72cb-44ea-856e-52e6744211d5</stringID>
    <pageitemID>55</pageitemID>
    <type>product</type>
    <status>inserted</status>
  </item>
</items>
priint:cloud extracts items.xml file directly from the data.xml sent via REST API. This means that the data.xml file should contain the items structure as display element with type=psc_items.
An example data.xml file looks like:
<data>
<display type="psc_items">
<psc_item>
<ID>3</ID>
<ID2>0</ID2>
<ID3>0</ID3>
<type>pagetemplate</type>
<pageType>1</pageType>
<document-position>-1</document-position>
<classID>3</classID>
<status>normal</status>
</psc_item>
</display>
<item type="pub" id="BB1474FE-B5C3-486D-9E18-96DFF230DE54" label="Publication">
<item type="doc" id="67479316-BBB8-462A-83C2-C71E27DEA01B" label="Document">
<display type="psc_items">
<psc_item>
<ID>1</ID>
<ID2>0</ID2>
<ID3>0</ID3>
<stringID>475a858e26a0f7da14c50f55c6c6481d</stringID>
<pageitemID>31</pageitemID>
<type>product</type>
<status>inserted</status>
</psc_item>
<psc_item>
<ID>1</ID>
<ID2>0</ID2>
<ID3>0</ID3>
<stringID>475a858e26a0f7da14c50f55c6c6481d</stringID>
<pageitemID>33</pageitemID>
<type>product</type>
<status>inserted</status>
</psc_item>
</display>
<item key="Drive" content="Postkarte"/>
<item key="Locale" content="de-DE"/>
<item key="Salutation" content="Hello Monika"/>
<item key="OfferText" content="You recently visited our priint:day, which hopefully opened an extraordinary experience for you. We would love to stay in touch with you and get excited about Personalized 1:1 Marketing with priint:suite. Convince your customers with unique solutions from Werk II.<br/><br/>Sounds good? Come join us between the May, 5th and May, 31th with the postcard and let us talk about the future of print. Bring concrete requirements or your planned priint:suite business model with you and benefit from our expertise. With the postcard as a voucher you get a "free consultation" in the mentioned period.<br/><br/>Your Priint Group Team"/>
<item key="Retailer" content="Werk II Medien- und Informationsgesellschaft mbH, Philosophenweg 51, 47051 Duisburg"/>
<item key="ProductImage" content="https://my.mam/pics/priint-day.jpg"/>
<item key="Background" content="hintergrund-5.jpg"/>
<item key="Address" content="Frau Monika Musterfrau Musterstraße 1 47051 Duisburg"/>
</item>
</item>
</data>
Finally, the PDF file looks like:
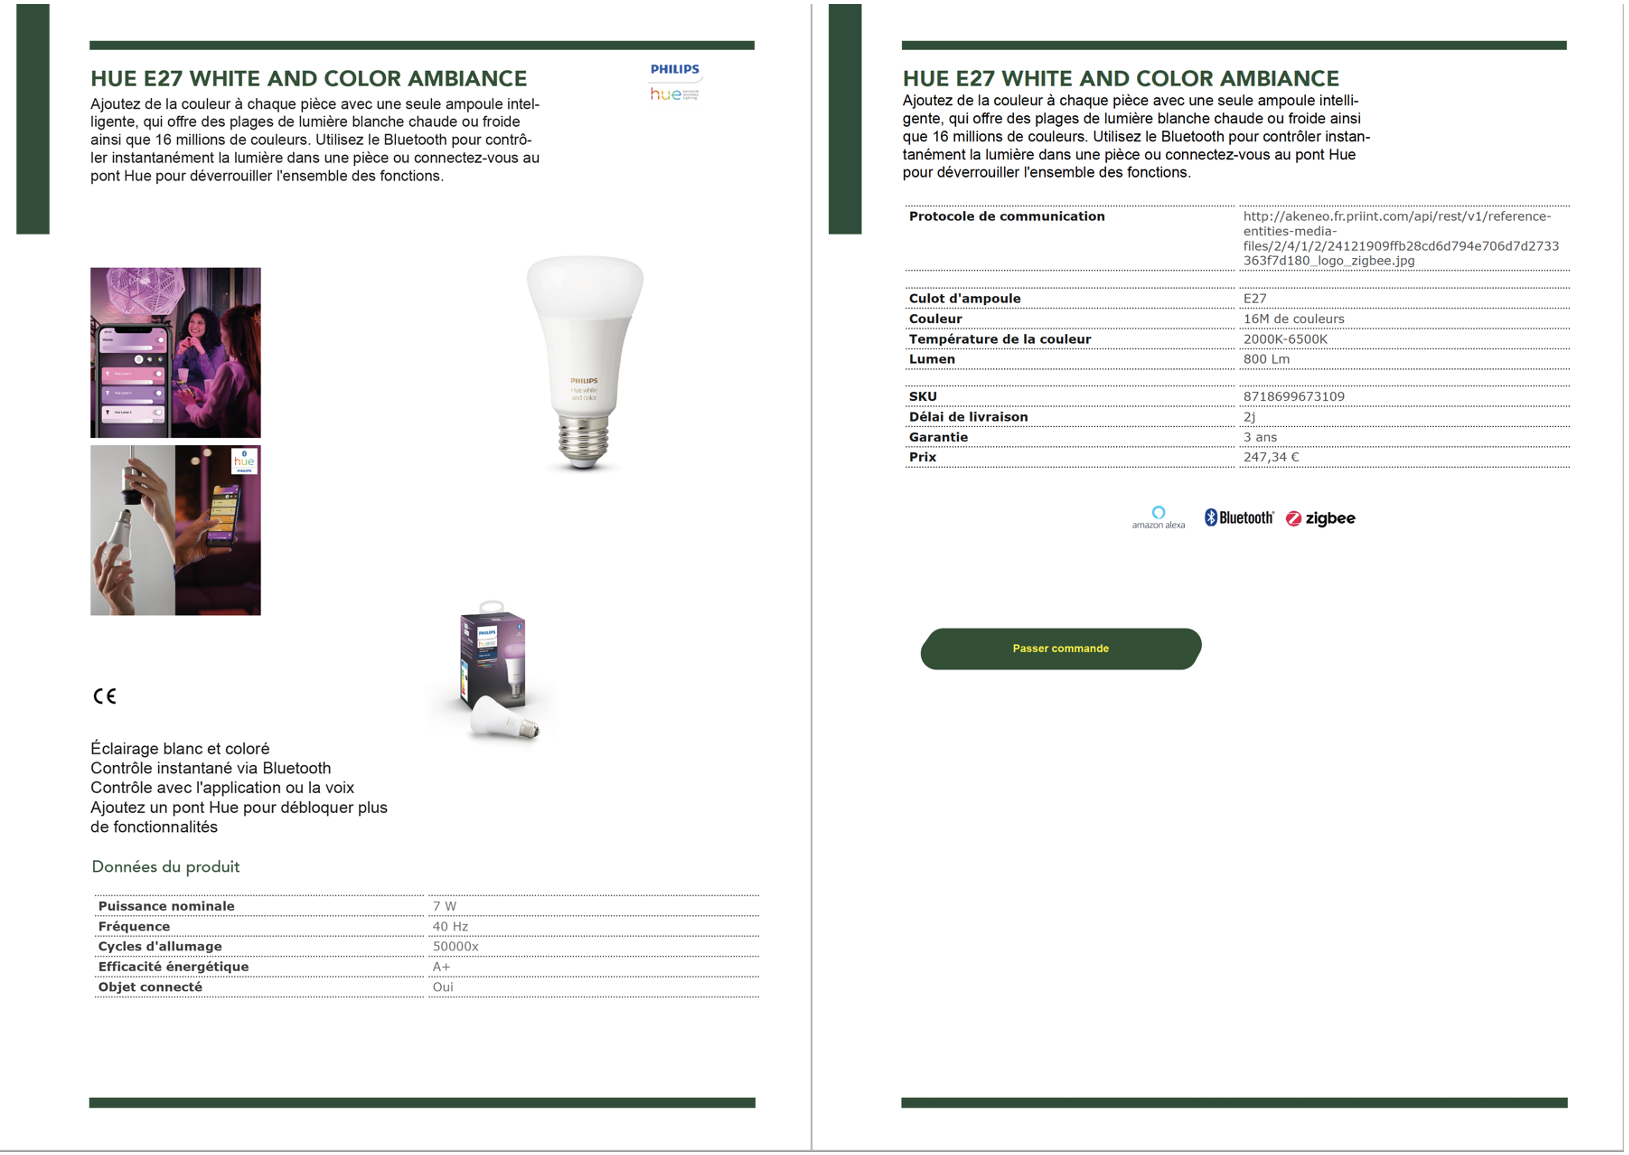
Example 2 - Product Datasheet with Multiple Templates
In this case we use 6 templates for the same product to build 4 pages of a product datasheet.
<items>
    <item>
        <ID>2</ID>
        <ID2>0</ID2>
        <ID3>0</ID3>
        <type>pagetemplate</type>
        <pageType>1</pageType>
        <document-position>-1</document-position>
        <classID>3</classID>
        <status>normal</status>
    </item>
    <item>
        <ID>1</ID>
        <ID2>0</ID2>
        <ID3>0</ID3>
        <stringID>48237473</stringID>
        <pageitemID>67765086</pageitemID>
        <type>product</type>
        <status>inserted</status>
    </item>
    <item>
        <ID>1</ID>
        <ID2>0</ID2>
        <ID3>0</ID3>
        <stringID>48237473</stringID>
        <pageitemID>67765090</pageitemID>
        <type>product</type>
        <status>inserted</status>
    </item>
    <item>
        <ID>1</ID>
        <ID2>0</ID2>
        <ID3>0</ID3>
        <stringID>48237473</stringID>
        <pageitemID>67765092</pageitemID>
        <type>product</type>
        <status>inserted</status>
    </item>
    <item>
        <ID>1</ID>
        <ID2>0</ID2>
        <ID3>0</ID3>
        <stringID>48237473</stringID>
        <pageitemID>67765094</pageitemID>
        <type>product</type>
        <status>inserted</status>
    </item>
    <item>
        <ID>1</ID>
        <ID2>0</ID2>
        <ID3>0</ID3>
        <stringID>48237473</stringID>
        <pageitemID>67765096</pageitemID>
        <type>product</type>
        <status>inserted</status>
    </item>
    <item>
        <ID>1</ID>
        <ID2>0</ID2>
        <ID3>0</ID3>
        <stringID>48237473</stringID>
        <pageitemID>67765098</pageitemID>
        <type>product</type>
        <status>inserted</status>
    </item>
</items>
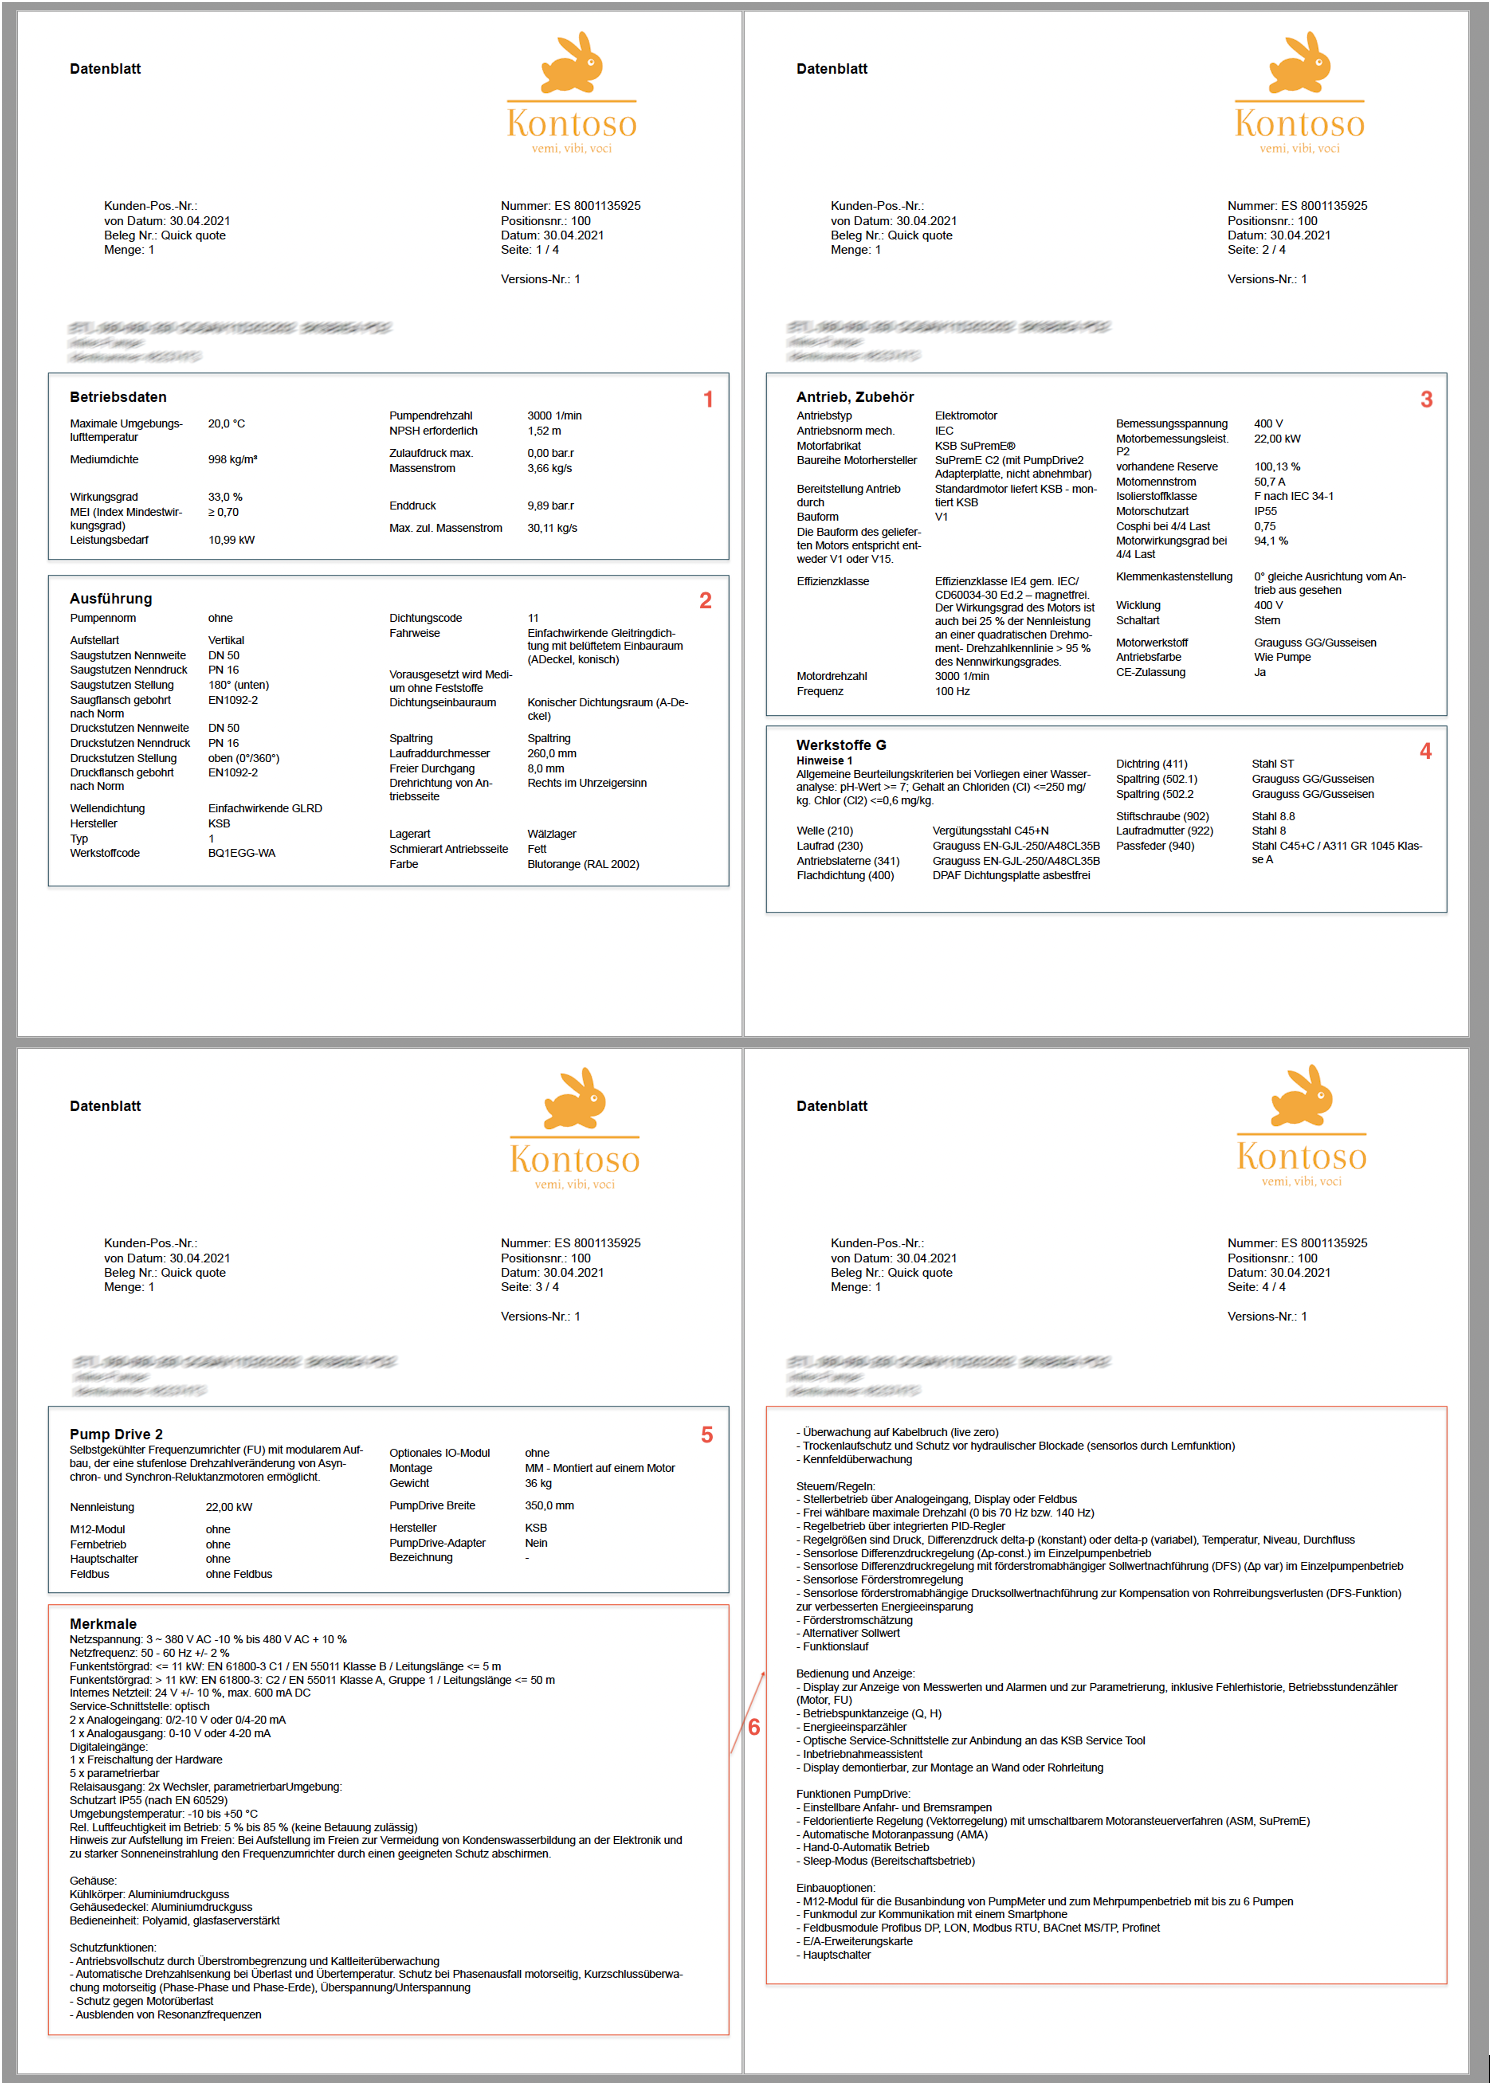
Example 3 - Product Datasheet with Smart Template
Here we used only 1 template for one product datasheet. But this template was configured as a “smart template” to build many pages.